*Please note, I am working on restoring pictures one by one, as Google has removed Picasa, where the photos were originally kept. Information should still be the same.*
The Shimanami Kaido is a 70km bicycle toll-road connecting Japan's main island Honshu to the island of Shikoku, crossing 6 beautiful bridges and 8 small islands in-between. A couple weeks ago our whole family made the entire adventure out and back, with a few minor "complications" along the way. For that reason, I wanted to make a "How-to" guide including maps, toll information, bike terminal information, public transportation, and our problems to help others avoid the same predicaments.
First I would like to clear up some misinformation I have seen on many blogs and websites about the actual route and transportation.
#1. The main route is 70km, not 60km as many sites say. The vehicle expressway is 60km, but the bike route is longer, with many cutbacks up to the bridges. So if you're hoping to be done at 60, you'll miss the last bridge and most beautiful view towards Imabari. (We were a little frustrated with the misinformation, and realized somewhere near 60km we weren't near the finish.) We did go to 70.
#2. Many sites say if you get tired along the way, you can take a shuttle bus back to the start from any of the bicycle terminals. Unfortunately, the only buses that take people will not take bikes (unless you have a Japanese style fold-up bike that is allowed on buses and trains.) This important bit of information turned our trip into 2 days and riding nearly the entire thing twice. (We caught a ferry on day 2, which saved us about 10 miles in the middle.) MOST ferries DO take bikes. Some do not, so it is good to check schedules anywhere you can along the way. (From ferry or bike terminals). If you plan to take a ferry, make sure to be standing at the edge of the dock before the ferry is in view, or it may go right past to the next stop.
#3. The final bicycle terminal does not have a return bus! For some crazy reason, the final bus and final bike return are at the previous bike terminal on the previous island. So if you rent a bike and want to do the whole thing one way, you'll actually have to go about 80km to get your bike back to a return terminal.
#4. The route is NOT entirely a "protected bike route". Through many of the cities there are places where you have to bike on the road with traffic. For this reason we DO NOT recommend towing a bike trailer. (We were extremely nervous crossing some narrow sections with traffic.)
To clarify, if you bring your own bike, only plan on going as far out as you can bike back. (Unless you happen to catch a ferry for part of it, or pay a LOT for a cab.) Later, I'll get into what to do if you get stuck somewhere.
Now for the fun stuff: The Route...
|
|
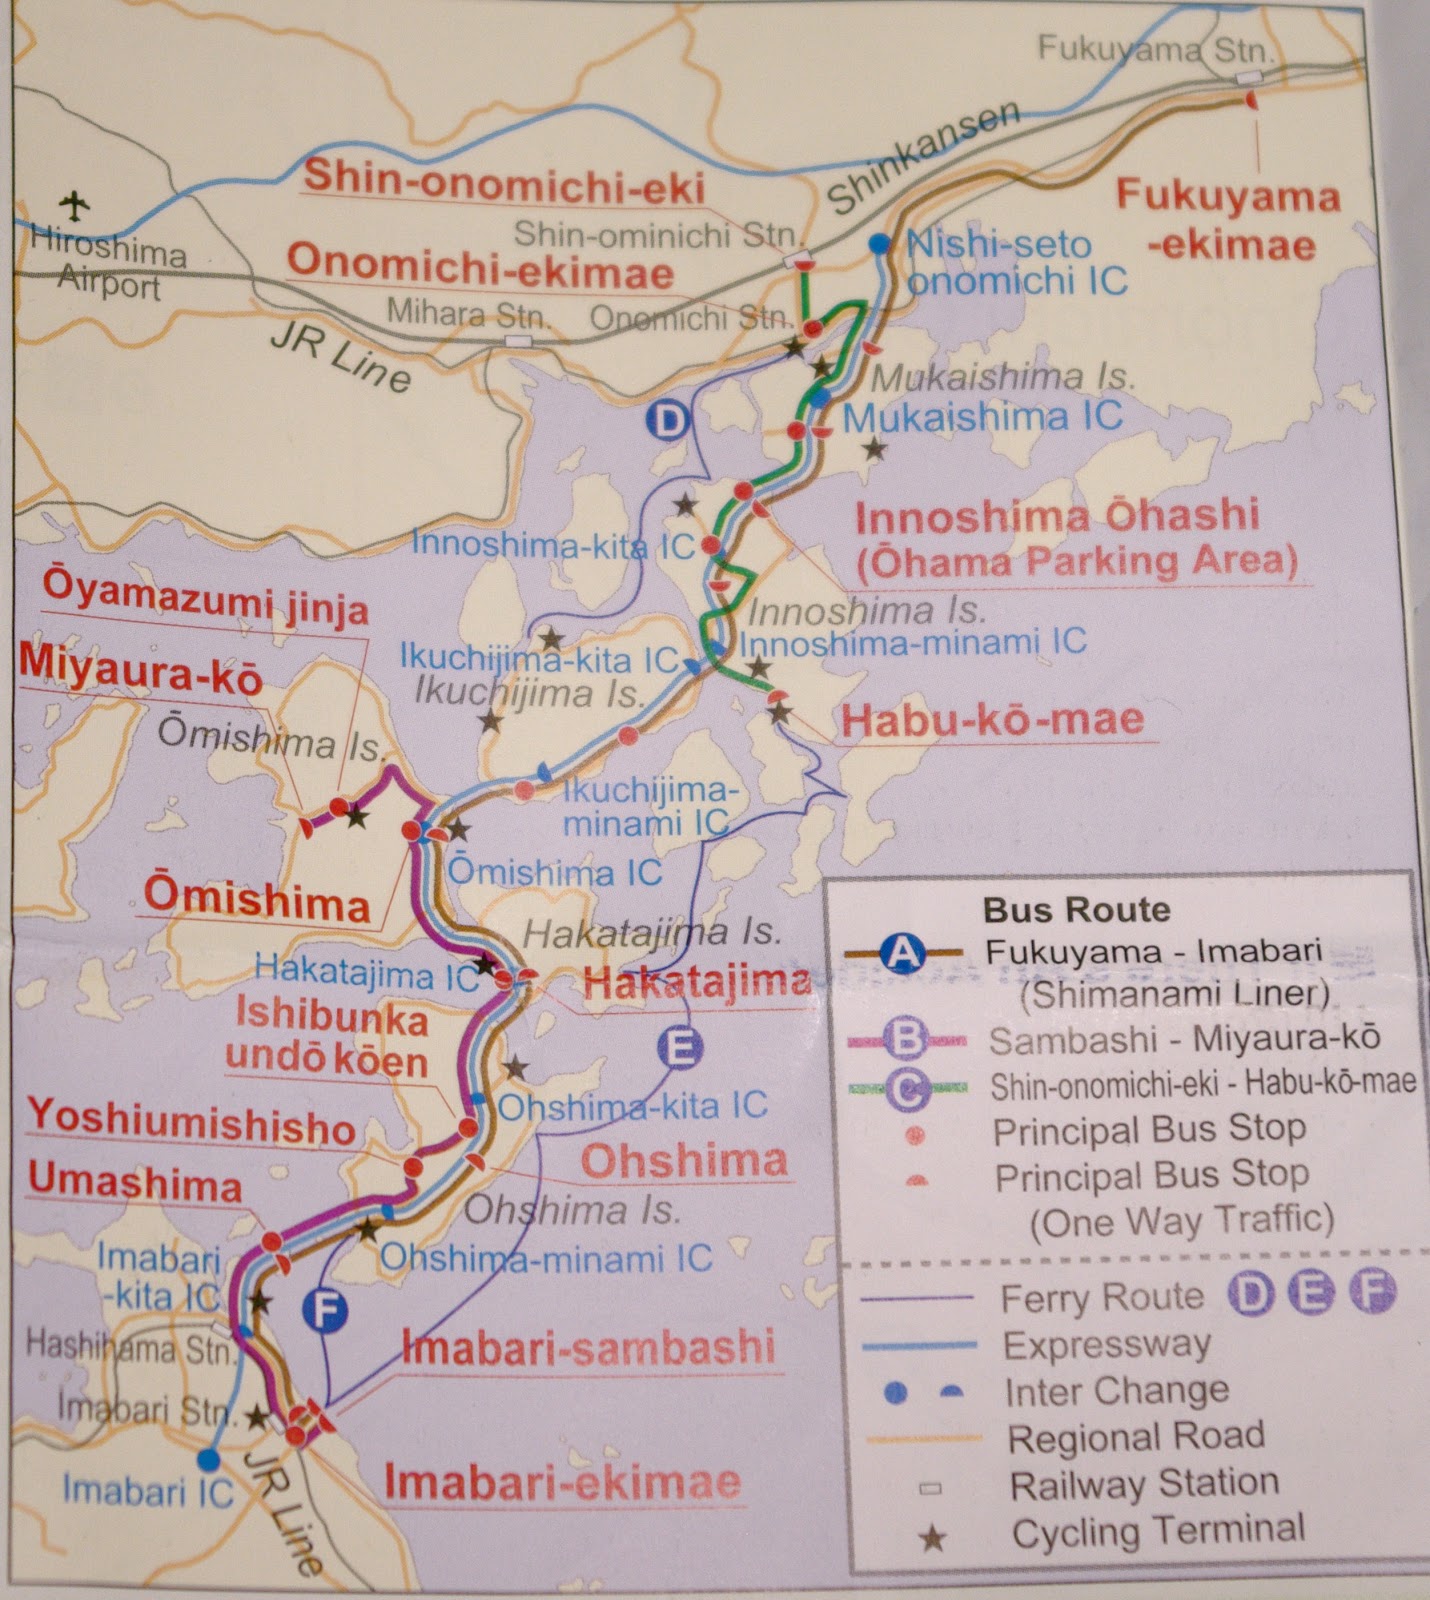
This map shows all the bike and public transportation routes including bike terminals
There is more than one bike route along the regional roads. Specifics to follow. |
These maps are courtesy of a guide from the ice cream shop on Ikuchijima Island. We did not have all this info prior, so were happy to find it. Also please note that these maps are not all aligned N-S. Ominichi is almost directly Northeast from Imabari, but smaller maps were rotated to fit on the guide.
The bike route starts at Ominichi Station, and is actually an immediate ferry ride across to Mukaishima Island. The two stars near Ominichi Station above represent bike terminals on each side of the ferry crossing. Notice on the map below that there are actually 3 ferries that cross (dotted lines). The preferred route is that directly in front of Ominichi Station. Bikes can be rented on either side, but the ferry stations are the only way to get across.
Here is the ferry station as viewed by the road, followed by other views around the ferry terminal...
Notice the green bike symbols at the ferry entrance.
 |
| Parking at port by Green Hill Hotel |
Warning: Parking in this structure is EXPENSIVE! It was around 300¥ per hour or 2400¥/day. With our unplanned extra day, our car was left over 24 hours, and our exit bill was 3200¥. If you plan to rent a bike, definitely take a train up. If you plan to ride your own bike, see if you can have someone drop you off. Bike rentals at all terminals are 500¥ for adults, 300¥ for childrens, 500¥ for tandem bikes, or 800¥ for electric bikes plus a required 1000¥ deposit incase the bike is returned to a different terminal. (In which case the deposit will not be returned.) Fortunately, bike rentals plus train rides are cheaper than driving on the expressways and parking.
 |
| Walkway between parking and ferry port |
To ride this ferry, you walk onboard without a ticket, and they collect yen from you as it is crossing. For our whole family (2 adults, 2 young kids) they only charged 250¥ (under $3). Next is a view from inside the ferry, and of the bike terminal on the other side where the ferry stops.
When you get off the ferry, make sure you know where you're going! Look for BLUE lines along the side of the road that follow the ENTIRE route! There are also these bike symbols strategically placed at some intersections on the course...
Of course we didn't know about either of these things to watch for, so took off straight and missed the first turn to the right. Luckily only a couple kilometers out of the way before we figured it out. Note some of the path is along brick sidewalks, and much through the islands on no sidewalk or bike path, just following the blue path along the side of the road.
When you make it to the opposite side of the island, you'll see the first bridge, but wonder where the on-ramp is. It is actually nearly a kilometer past the bridge! So keep a lookout for the bike signs.
 |
| First bridge, before on-ramp. Keep going! |
Turn left up to bridge. Notice blue lines.
 |
| Early April view of Innoshima Bridge through the Sakura Blossoms |
 |
The bike path follows under the vehicles on Innoshima Bridge.
Note motor-scooters can too, and foot-passengers on the green. |
Part way through the bridge you'll run into a toll stop that looks like this...
Put your 50¥ per person in the slot and proceed. Here is a listing of all the tolls so you can make sure you have the right change when you get to them...
The recommended route goes a little inland after the Innoshima Island bridge, climbing over some mild hills, and joining an intermediate route on the back side. (The intermediate route on this island is more hilly, and less protected from traffic. There is also an advanced route around the opposite side of the island.) Even taking the recommended route, the area labeled "Narrow street" was our absolute scariest portion of the route, which had my husband wanting to turn around with the kids' trailer. We did wait for small breaks in traffic and pulled over between buildings a few times to make it through. There is no sidewalk or bike lane. Luckily that only lasts about a kilometer.
Then comes bridge #2 to Ikuchijima Island...
And views from the other side of the bridge with some orange trees...
On Ikuchijima Island, about half way around the "recommended route" along the coast, there is this ice cream shop right along the path. Notice the path is a brick side-walk through this area as well. (Or joining cars on the road.) This place has many flavors of delicious ice cream/gellatos, fresh juices, and some "real food." It was a heavenly find after a couple hours of riding, especially for the kids.
Ikuchijima Island is a very safe island for riding, with mostly protected lanes. Here is bridge #3 to Omishima Island...
 |
I had to stop here because the trailer was coming loose! My husband fixed it. :)
Another reminder, don't bring a trailer! The hills make a lot of strain on the bike. |
The recommended route across Omishima Island is a little over 7 km to bridge #4 to Hakatajima Island...
The recommended route across Hakatajima Island is very short, so you quickly see the next bridge when biking onto the island. Here's bridge #5 to Ohshima Island...
Ohshima Island is a quite a bit longer ride across at about 11.3 km, but connecting the final bridge to Inabari. Ohshima Island has a "Rest Park" which you will see signs for along the route. The FINAL RETURN BUS is at this park by the bicycle terminal. At this point, if you have rented a bike, your options are to return it there and take the bus back, ride about another 20km to the Imabari City bus station and bike terminal, or make a 2-way ride across the final bridge so you can see it beautiful views and return your bike to the "Rest Park". When you make your decision, please note that the Kuroshima-Kaikyo Bridge is much higher and longer than all the other bridges at 6.4 km across. Like the other bridges, the incline stays at or below a 3% grade with loops gradually circling up.
Here's some of the ride across Ohshima Island followed by the final bridge...

Here is the final bridge (#6), the Kurushima-Kaikyo Bridge to Imabari, which we arrived right before sunset...
When you approach the end of the Kurushima-Kaikyo Bridges, you will see signs towards a bike terminal. Please remember, this terminal does NOT HAVE A BUS! It is for bike rentals only. If you have a rental bike you can also ride past this terminal to the terminal in Imabari City by the bus station. There is a city bus which operates from Imabari Station, but it DOES NOT TAKE BIKES. This bike terminal is for returns only, so if you take a bus there planning to rent and ride the other direction, you won't be able to rent. If you are stranded in Imabari, there IS a Ferry, which takes bikes on a limited schedule (7x per day).
See this map for ferry routes E and F. Note route D is currently NOT IN SERVICE. So getting back via ferry from Imabari Port will only get you to Habu-ko Port on Innoshima Island. This leaves approximately 25.5 km of cycling back to the ferry port to Onomichi.
We got stuck in Imabari after the final ferry and buses (and weren't yet informed our bikes weren't allowed on the shuttle busses). So, got a hotel, and the next AM, rode our bikes from Imabari all the way back over the Kurushima-Kaikyo Bridge to the "Rest Park" (where we were informed they would not shuttle our bikes.) We then rode all the way around Ohshima Island to Tomoura-ko Port, where we waited about 90 minutes to catch the next ferry to the Habu-ko Port.
Here are some photos of the Tomoura-ko and Habu-Ko Ports...
 |
Ticket Machine for ferry. Blue is adults, red children. We also paid for bikes, but to cashier.
We were the highest prices going to Habu-Ko Port. Several stops between. |

Here's the arrival port in Habu-Ko. Much more commercial, with groceries and some clothing for sale inside.
Here is a map with the route between the Habu-Ko Port and Onomichi Station:
Notice you will have to travel further across Innoshima Island than you would on the regular route, plus back around the first island to the Onomichi ferry port. Hopefully you get back to the ferry before it stops for the day. When you do, it is a wonderful feeling of success. We hope you try it!
Finally, here are some tips for your journey...
-Check the weather report! We did check in advance, and were lucky to have beautiful weather, but rain would have made a short trip.
-Start Early!!! Who knows what drama may be in store for you.
-If you can't find transportation information prior to heading off on the Onomichi Ferry, ask when the last departure time will be so you know when you have to be back. Also look for maps or schedules anywhere you stop.
What to Bring:
-Cellphone
-Map
-Extra clothes (incase you get stuck or eat someplace nice)
-Flipflops or extra shoes to walk in (I was thankful for my flip-flops! My husband didn't have any)
-A full day's worth of food + at least 2 water bottles (you can refill several places, but if it's warm, you'll use it up quick.)
-Bike gear: helmet, sunglasses, bike shoes, pump (or a few CO2 cartridges if you know how to use them), 2 extra tubes, lights (incase you get stuck at night), reflective gear
-Bring lots of extra yen!!! (As in an extra 30,000¥ or so) You don't want to get stuck anywhere without it. If you have a credit card or ATM card, don't expect anywhere to take it. You'll see several of these symbols:

However, this is for Japanese cards only. NO Western ATM cards are recognizable on these machines. (After missing the last ferry this cost us an extra day and hotel cost instead of being able to pay for a cab.) If you do miss the last ferry, you can get a cab to Ominichi, but it's about 250,000¥ Yes, that was over $250 at our time of travel.

Instead, if you need cash, find a bank or sometimes a 7-11. Here's the bank we found in Imabari (which opens at 9 AM on Sundays.)
Finally, here are some links with other good information:
http://www.japan-guide.com/e/e3478.html
http://www.go-shimanami.jp/global/english/guide/index.html
http://www.anchorage.jp/setouchi/mihara.html
Bus schedules (no bikes):
http://www.city.onomichi.hiroshima.jp/english/kanko/shimanami/shimanami04.html


